Nothing is more rewarding than catching a fish on a self-made lure. Are you a crafter, a DIYer or just curious about the manufacturing steps? This article will help you understand the main mechanisms for making a trout lure, but also how it works.
First of all, it is important to have an idea of the design (shape, size, etc.) of the lure. The easiest way is to make a sketch on sticker paper (side view and top view).
To make a hard lure, you will also need to choose the material. Several options are available to you :
Note: all of our PNs are made from biosourced and biodegradable resin. We advise you to stick to wood , because epoxy resin and expanding foam are very harmful to the environment.
For the rest, we will continue with the example of wood. Before arriving at the final product, there is a huge amount of design and labor to achieve perfect swimming and balance, effective on fish.
3) The frame
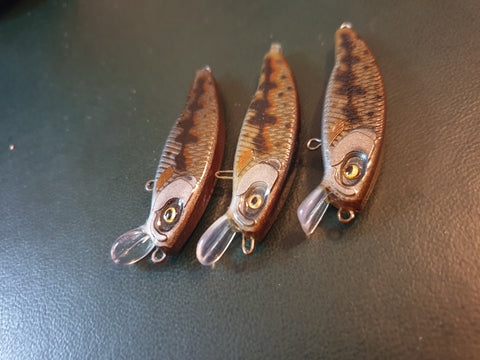
It is she who will receive the line and the two hooks. Two solutions are available to you:
- Make a complete armature with piano wire as in the photo. This requires you to cut the lure lengthwise to insert the frame and reassemble it.
- Or the simplest (what we recommend): screw in small eyelets with a dot of glue.

4 ) A little technique ;)
Several things will have an influence: the shape and inclination of the bib, the general shape of the lure, and its balance.
-
The bib: it is this which will make the lure swim. Depending on the size, shape and inclination, the lure will swim in different ways (tight, slow or dynamic swimming, resistance to the current, etc.). There is no complete science (or we have not yet found it), we must test!
-
Balance: it is this which will “animate” the lure during poses. Several are possible, but as a general rule, the lure must descend horizontally (oscillating) for a sinking model. You therefore have to use weights inside the lure. For suspending, same principle except that the lure must have the same density as the water!
-
The shape of the lure: it will also have an impact on swimming, on resistance to the current, and also on balance. Depending on the shape, the hydrodynamics will be different. Here too, numerous tests are necessary.
You will have understood, the entire action of the lure will depend on these parameters!
5 ) The bib
In the case of a handmade lure, the shape is already defined so there is no need to rework it. We advise you to start with a round bib: it is the easiest to work with. Once the bib is made from plexiglass or fiberglass, you can mount it on the lure by cutting a slot with a cutter and sticking it with liquid or epoxy glue.
Note: why do it before contrary to what other tutorials on the web say? Simply because the bib provides hydrodynamics. If set, the lure will descend into the water horizontally. But the bib will exert a force on the water, which risks unbalancing the lure. Depending on its weight and especially its size and shape, the balancing will be different.
6) Balancing
Tie the hooks, and put the lure in the water. Depending on your descent, you will have to put weight at the head or tail. The goal is for it to go down horizontally. To attach the small metal weights to the lure, it is best to make a small hole on the belly to insert the ball, sealing it with wood putty. A final sanding is necessary to even out everything.
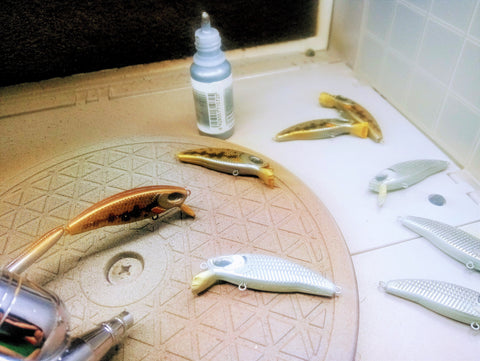
7) Painting
You must start by masking the flap, and blocking the pores of the wood by applying a wood primer.
From there, the imagination is free to run. You can lay down aluminum foil, holographic film, or simply paint your lure however you like. Everything is possible !
For airbrushing, the use of a stencil is mandatory. It is possible to cut them from a sheet of paper or plastic for example.
8) The opening
The varnishing will depend on the material:
- For wood, two coats of marine varnish will do the trick.
- For wood and everything else: epoxy varnish is very solid, just like UV or cellulose varnishes.
Notes: it is possible to use a varnish lathe, which smoothes the "skin" of the lure, for a better visual effect!

II) And how do we do it?
We model our lures directly on CAD (computer-aided design) software, which allows us to move directly to mass production.
But first, months of design and testing are necessary to achieve innovative swimming and perfect balance. In addition to many different tests to choose the best bib to match the general shape of the lure, we work a lot on balancing.
To do this, we play on 7 to 8 different mass points to achieve the best possible balance. The ballasts are made of steel while remaining respectful of the environment.
Once the two hulls have been manufactured (in biosourced and biodegradable resin) using an innovative, secret process , they are assembled (by adding the metal frames and steel ballast), then glued. Sanding is the last step in the “assembly” part.
The painting is done manually using an airbrush but certain details are done with a brush or small sticks. Stencils are required.
We use a glittery paint as a base that shines in the sun, and on top of that more matte colors to enhance the natural side. The paints are acrylic (i.e. the solvent is water), "Made in Spain", and are therefore more environmentally friendly than solvent-based paint.
Finally, the last step: the varnishing ! We use anti-UV varnish for spray guns which makes it easier to apply, greater smoothing while using less product... ;)
Why not use a biosourced varnish? We have tested almost all the varnishes on the market, and unfortunately there is currently no equivalent offering such good resistance to the elements.
The limit is therefore technological.
III) How to make a soft lure by hand? (or almost)
After several months of testing, we have developed a minnow imitation, very natural and effective in swimming action. But how to proceed? To achieve this result, we first started making prototypes out of modeling clay . The important thing is to have a more or less final idea of the desired shape.
From there, the next step is to make the molds. Two solutions:
- Produce a model on the computer in order to machine an aluminum mold. The latter, although expensive to manufacture, has the advantage of being almost indestructible.
- The second solution is to make a silicone mold. I invite you to watch one of the many tutorials available on Google.

Once cast/injected in a base color, all that remains is to airbrush the lure and glaze (temper) it to smooth it out.
Note: our soft lures are guaranteed to be phthalate-free (highly toxic chemical compounds) making the lure more environmentally friendly.